Friday, December 31, 2010
New Year's Eve Tomatoes
At the closing of the year we are still putting tomatoes in the nightly salads: just a few to make them last as long as possible. Of course, in dark December they don't have the rich flavors of August, yet somehow the minimal spark they provide pulls together the lettuce, spinach, and arugula into a unified burst of flavor.
The hanging vines out in the garage are picked over and bedraggled, so this won't be going on much longer. It's been a good run.
Saturday, December 25, 2010
Christmas Reds and Greens
Evergreens in the house are an essential part of Christmas and just a few simple touches can evoke the season. It's even better when the glossy branches and bright berries can be gathered from the yard.
We don't really have enough to form a whole wreath or swag, nor am I willing to put in the time making them, but it feels so good to cut a few branches from the berry bush and the little redwood tree in the front yard to fill out the inexpensive store-bought greenery.
The seasonal backyard produce is also thematically correct with a range of dark greens set off by soft reds. Even the tomatoes from the garage are in harmony. (And we've been very happy to use the backyard bounty in simple meals of soup and salad to balance all the rich once-a-year fare: fruitcake, eggnog, exotic cheeses, nuts, and fruits, etc.)
Out in the garage the hanging tomatoes (the few remaining branches of the summer plants, rescued from the first frost in late November) form a makeshift Christmas tree with colored bulbs attached. Like the inside tree, this one will not be taken down for several weeks to come -- not until the last harvestable morsel has been gathered -- as we try to wring every bit of delight from this all-too-brief season of celebration.
Tuesday, December 21, 2010
A Fragrant Winter Soup
We ended the shortest day of the year with a warm, fragrant, and comforting winter soup that started out as a minestrone but didn't make it that far. The mushroom broth enlivened with vegetable juices and just a touch of fennel seed was so good that B. didn't want to weigh it down with beans and pasta. So it ended up as a simple vegetable soup. A spinkling of fresh grated parmesan cheese, and some homemade whole grain bread rounded out a cozy meal.
Along with garden chard, the backyard contributed some blue potatoes to our solstice dinner. This was a second surprise harvest from the little patch that won't quit. There was already one volunteer harvest earlier this year and then, on November 26, I dug up the pile pictured above. All of these went into tonight's soup, which was already special but became even more so.
Monday, December 20, 2010
The Solstice Eclipse
Despite the gloomy weather, Bay Area skywatchers and mere curiosity seekers like myself are tracking tonight's total lunar eclipse. It is a very rare event because it falls on the same day as the northern winter solstice -- the moment at which the Earth's north axis is tilted farthest from the sun, giving us our shortest day and longest night of the year, and heralding the first day of winter. According to NASA Science News, there's only been one other lunar eclipse on the northern winter solstice in the last 2,000 years . . . and that one was back in 1638.
According to information from Oakland's Chabot Space & Science Center, the eclipse begins -- or began, because it's underway now -- when the Earth's shadow starts to slide across the full moon at 9:30 p.m. Monday night, December 20 (tonight). Complete coverage -- known to astronomers as "totality" -- lasts from 11:40 p.m. until 12:53 a.m. on Tuesday, December 21, and the eclipse should be over by 2:00 a.m.
I took this follow-up photo at 11:50 p.m., ten minutes past "totality." What I saw -- or thought I saw -- and tried to get a picture of was the last tiny fingernail clipping of light disappearing behind a thicker layer of fog. I don't know why it was still visible at that point in the process. When I enhanced the photo there was indeed a small pale smudge in the center, but I couldn't get the enhanced photo to upload. There are far better photos and videos of the whole event all over the internet; nonetheless, it's nice to keep a personal vantage point on the cosmos from one's own backyard.
Besides tracking the eclipse, I also marked the solstice by hanging the first section of this marvelous calendar which provides a beautiful wall poster for each quartile of the natural year: winter solstice to spring equinox, spring equinox to summer solstice, summer solstice to fall equinox, and fall equinox to winter solstice.
The reddish circle on the left edge is the solstice lunar eclipse, which marks the beginning of another cycle of light in our journey round the sun.
Note about the calendar: The link goes to the 2010 calendar at Amazon but I know the 2011 version is available. I bought mine at Whole Foods.
Note about the time stamp: Blogger has an interesting habit of marking the time the first draft of a post is saved. I started this post earlier in the evening and saved the draft, worked on it some more later and didn't actually publish until a few days afterwards. But the date and time stamps show the time of the first draft.
Wednesday, December 15, 2010
Leaf Lady
I think I know how the squirrels and the woodpeckers must feel when they have laid in a good supply of acorns.
The backyard leaf pile has reached a satisfying height. The top layer, a bright cascade of colorful confetti, comes from two flowering cherry trees across the street. I spent about an hour raking them up at the invitation of a neighbor who was glad to have his yard cleared and, in the bargain, donate the leaves to a worthy cause.
Everything in this pile comes from various trees on our short street, one block long, plus a few bags I've collected during our nightly walks around the neighborhood. Feeling only slightly eccentric, I carry a grocery bag, a dustpan, and a flashlight, and whenever we come across a lush drift of leaves covering the sidewalk, I scoop them into the bag. Leaf Lady strikes again.
Leaves are free mulch, free fertilizer, and -- eventually -- free soil if you are willing to wait a couple of years for everything to break down. I use them in the compost bin to form alternate layers with kitchen scraps and also to cover dormant garden beds.
As my greed for leaves has become more widely known, some neighbors on the block have started leaving them in our front yard. Now I have two leaf piles!
Tuesday, December 14, 2010
Finally! A Frittata di Trombetta di Albenga
It took about five years to get from the first planting out of seeds for the dramatic Italian climbing squash, Trombetta di Albenga, to actually featuring some in a meal.
Year 1: Discover a packet of Renee's Garden seeds at a local drugstore. Plant some out of curiosity. Become so intimidated by the gargantuan plants and strange elongated fruit that none of them get used for food. Forget about it for a couple of years.
Year 4: Find the old seed packet with some seeds left in it. Plant some out of curiosity, wondering if they will grow. They do. Vow that this time the squash will make it into a meal. It doesn't. Vow not to plant Trombetta di Albenga again.
Year 5: Discover some seedlings of Zucchetta Rampicante at a local nursury. Plant some out of curiosity. Find out that Zucchetta Rampicante is Trombetta di Albenga by another name, or such a close cousin that there is no discernible difference: long thick vines twining up eight foot poles and across a trellis, bearing numerous sleek green fruit that dangle in mid-air as they grow larger and longer. Give up, accept the dictates of fate, and welcome Zucchetta/Trombetta into our family cuisine.
Most of this year's harvest found its way into the summer batches of green soup. But finally, in early December, we used the last tender squash in a delicious frittata. The recipe comes from the attractive Italian food blog, Not Only Pizza. The secret to getting the best flavor is to slice the squash into thin rounds or half circles.
Another secret is to use really good cheese, such as Asiago. Here's the recipe:
Frittata with trombetta di Albenga
(From notonlypizza.com)
Ingredients:
1 lb. trombetta di Albenga
2 cloves of garlic
7-8 datterino tomatoes or cherry quartered or cut in half
3-4 fresh basil leaves
4 eggs
1/2 cup shredded provolone, scamorza (not smoked), Asiago or a cheese of your choice
2 Tbsp. extra virgin olive oil
sea salt to taste
Preparation:
Slice the trombetta thinly with a knife or a mandoline. Heat up 1 Tablespoon oil in a nonstick skillet with 2 cloves of garlic. Add the squash and cook it until tender, about 15 minutes mixing it often.
When the squash is cooked, turn it off and add the tomatoes. This is already a good side dish.
To make the frittata, eliminate the cloves of garlic, put the cooked squash in a bowl, add the basil, the eggs, the shredded cheese and a good pinch of salt. Mix well.
Heat up 1 Tablespoon olive oil in a non-stick skillet and pour the zucchini-egg mixture. Cook at low medium heat for about 10-15 minutes uncovered or until the bottom becomes golden brown.
Place a large plate over the frittata and turn the pan upside down then slide the frittata back in the pan and cook it for other 10 more minutes. Serve it warm or tepid, it’s good either way.
Here's what the squash looked like in late September, still sizing up on the vine.
And here's how it appeared on our dinner table at last!
(Full disclosure: It turns out that another really important secret for a perfect frittata is to use a non-stick pan so the whole thing doesn't fall apart when it gets flipped over. But that's just a minor detail in the long saga of Trombetta di Albenga, which is not only abundant but really quite delicious.)
Sunday, December 12, 2010
Have Nut Loaf. Will Travel.
Every Thanksgiving we go "over the river and through the woods" to take part in a pot-luck feast of food and friendship. "Over the river" happens in Healdsburg, where Highway 101 crosses the Russian River as it runs west to the sea, and "through the woods" happens in southern Mendocino County, where fragrant groves of bay laurel, live oak, Doug fir, madrone, and second-growth redwood cloak the rocky hills between Cloverdale and Booneville.
It's not grandma's house we're headed for, but a thriving counter-culture conclave founded in 1970 -- forty years ago and counting -- where former Peace Corps and Vista volunteers and friends have been tending (organically, of course) a large acreage of ancient apple trees.
The Thanksgiving pot-luck is well established, with the same people bringing the same dishes year after year. The hosts can determine the menu simply by asking around to verify who will be coming, uncovering any gaps that might need to be filled. Generally speaking, you can always count on M.'s hor d'oeuvres, T's traditional Czech Hoska (a showstopper braided bread), B.'s stir-fried veggies, P.'s Waldorf salad, and N.'s classic pumpkin pies from her grandmother's recipe -- to mention some of my personal favorites.
The photo above shows a few of these old-reliable dishes, plus the time-tested vegetarian entree, the nut loaf.
It's our responsibility to bring the nut loaf, an obligation not to be taken lightly.
This year, a couple of weeks before Thanksgiving we got the usual phone call confirming that everything was on as planned, and the usual not so subtle hint about our role:
Here's how to make this enthusiastically received holiday classic. It first entered our repertoire decades ago during college days in Berkeley, from Richard Hittleman's Yoga Natural Foods Cookbook, now out of print. My copy vanished long ago so I'm not sure how many adaptations have crept into our version over the years. Once change I do remember introducing is to use wholewheat toast cut into cubes, rather than bread crumbs -- so much easier!
1 and 1/2 cup walnuts, very finely chopped or blended
3 cups toasted whole wheat bread cubes (toast the bread then cut into small cubes)
1 cup celery, very finely chopped
1/2 cup onion, very finely chopped
2 eggs, beaten
3 tablespoons oil
1 cup tomato juice
1/4 cup parsley, very finely chopped*
Salt and pepper to taste
2. Mix dry ingredients together in a large bowl.
3. Beat together eggs and oil, combine with tomato juice.
4. Mix wet ingredients into dry ingredients. Don't be afraid to use your bare hands to make sure everything is thoroughly mixed together and liquids are evenly distributed.
5. Pack mixture into a well-buttered loaf pan (for a round loaf use a Pyrex bowl) and bake 45 minutes to an hour in a preheated 350 degree oven. Cover with tinfoil for the first 30 minutes. Test for doneness by inserting a table knife into the center -- when hardly anything sticks to the knife it should be done. The loaf should have a well-browned appearance.
6. Run a table knife around the edges of the pan and turn the loaf out onto a plate. Pour mushroom gravy over the top, garnish with cranberry sauce and parsley*. (The cranberry sauce is important for fullest holiday splendor and taste. The parsley* is important because without it the dish can be mistaken for a dessert.)
And here's how to make the mushroom gravy, an absolute must accompaniment. (Sometimes I think we should be greeted with cries of "Hooray! The mushroom gravy has arrived!") These are B.'s instructions:
1. Put a pound or so of cleaned whole mushrooms in a pot. Cover with water plus an inch or so.
2. Bring to a boil.
3. Add juice of one lemon, some white wine or sherry, and five or six pepper corns.
4. Boil for 20 minutes until you have a dark broth. Strain and set aside.
5. Make a roux: Melt 3 tablespoons butter in a saucepan and add some finely grated onion. When the onion is soft, add three tablespoons flour, blend until smooth.
6. Mix one cup of the mushroom broth into the roux. Add as much as needed to get the desired consistency of gravy. Slice up some of the whole mushrooms to add to the gravy.
Save any leftover broth for soup.
*A note about parsley: For the last several years the parsley has been coming from our backyard. All I had to do is run out the kitchen door and gather as much as was needed from generous swaths of volunteer plants. But this year, no parsley. It felt like cheating to have to buy some. Must plant more.
Wednesday, November 24, 2010
First Freeze -- Last Fruits
Last night, during an all-too-short interval between a day at work and a night-time event, I found myself out in the garden with a flashlight, stripping the remaining tomatoes, eggplant, and trombetta squash off their respective plants. Freezing temperatures were predicted.
After covering the little potted Meyer lemon and bidding a fond farewell to the basil and nasturtiums, I dashed off to store the last fruits of the summer season in the garage and the kitchen. Clipped branches of tomatoes were hung in the garage, dangling above the one huge, pale beige trombetta that had managed to transition into a winter squash. The eggplant, loose tomatoes, and still-green trombettas went into the house.
This morning I went out to check on the carnage. The basil had turned black overnight, so the expected killing frost had occurred as foretold. The drooping nasturtiums were still green, as were the tomatoes, eggplant, and squash, but they all had lost their will to live, cells burst open by shards of ice that formed inside.
Meanwhile, the spinach, kale, and broccoli were standing tall: "Ah, a bit of frost -- just the refreshing pick-up we were craving."
Sunday, November 21, 2010
November is the Month of Greening
In many respects November in our little corner of the cosmos behaves as a proper fall/winter month should. Days get shorter, nights get longer, cold winds and rain blow falling leaves through chill air.
But at the same time a whole other narrative unfolds. In a Mediterranean climate like ours there are really only two seasons: wet and dry. The dry season runs through what is traditionally known as spring, summer, and early fall: May through October. The wet season runs more or less from late fall to early spring: November through April.
When the first rains fall, announcing the shift from dry season to wet, the parched brown earth responds immediately with tiny shafts of new green growth pushing up through dead thatch. Out in the countryside dusty hillsides take on a pale greenish blush and gradually get covered with luminescent carpets of gaudy green.
In our backyard there are newly fallen leaves layering the ground and vigorous seedlings sprouting beside them.
Our backyard "meadow" changes -- with some help, consisting mainly of removing the dead debris -- from a stand of dried up Queen Anne's Lace, wild fennel, and mallow to a quasi-lawn: the only time of year we have what could remotely be called a lawn.
The winter garden surges: spinach, kale, lettuce, peas, broccoli, chard, leeks. The paths start filling up with lush volunteers: arugula, lettuce, kale, yard chard galore, along with the usual roster of weeds. Alongside the flourishing winter growth, the summer garden languishes as the plants turn limp and yellowed: tomatoes, peppers, summer squash, eggplants, basil.
I'm always reminded of the lines from Bob Dylan (It's Alright Ma): "He who is not busy being born, is busy dying."
Thursday, November 4, 2010
Insanely Great Pasta Sauce
It was the continuous supply of eggplant that led to B.'s latest culinary breakthrough. Even though the season is just about over (after all, it's November!), the memory lingers on and will provide inspiration for next spring's planting decisions.
Two plants of Hansel eggplant and two of Fairy Tale produced gorgeous platefuls of glossy purple fruit that sat around on the dining room table, just asking to be made into something wonderful.
It wasn't the best season ever for tomatoes but there were still enough on hand (Early Girl, Black Trifele, Sun Gold, Yellow Pear) to fill their own plates and provide their own entrancing palette of color.
Since they were meant to be together -- like moonlight and music -- it was only a matter of time before they ended up simmering together in the same pan with some olive oil and crushed garlic. The little Fairy Tail teardrops didn't even need peeling, they were so tender. They disappeared completely into the sauce. The Hansels were peeled and sliced up and cooked until soft along with the tomatoes.
Sometimes B. would blanch the tomatoes first to get the skins off, and sometimes just quarter them and set them in the pan, skins and all. Pictured above is a skins-on batch. Whole basil leaves, just picked, were added towards the end of the cooking time.
Voila! A sauce that is so utterly simple yet subtle and rich with the tang of fresh tomatoes and the smokey undercurrent of eggplant, so silky it coats the noodles with flavor that lingers in the mouth and in the mind.
Another approach that draws out of the savor of the eggplant even more is to roast them whole for an hour in the oven. Just cut off the tops and prick them with a fork, coat lightly with olive oil and set them on an oiled baking sheet. Take them out when soft and collapsing into themselves, slit them open and squeeze out the yummy paste.
The eggplant is then combined with oven-roasted tomatoes. These were cooked for half an hour in an iron skillet with a layer of olive oil and some crushed garlic. When done, set the skillet on the top of the stove, add the eggplant paste and simmer gently until the mixture forms a sauce.
The roasting method produces a smoother sauce because all of the eggplant disappears into the magical meld of mouth-watering goodness.
Whatever route you take to get there, it's an insanely good pasta sauce.
Monday, November 1, 2010
Easy Refrigerator Pickles
As of early October we had a goodly pile of lemon cucumbers in the refrigerator, the last survivors after our one very prolific plant had succumbed to mildew and been removed. For months we had been eating the cukes fresh and giving them away. We were tired of them and so were our neighbors.
I had never made pickles out of anything but it seemed worth a try if it didn't take too much time. As usual, a little internet sleuthing yielded some good suggestions.
The recipe I ended up following was compiled from several sources. It had to be easy and not sweet -- no sugar. Mostly it had to be easy.
The cucumbers sliced up nicely into six cups worth. To this was added some chopped cilantro and some chopped green onion.
I brought to a boil two cups of vinegar, plus spices (1 tablespoon each of celery seed, mustard seed, and turmeric) and pickling salt (2 tablespoons), and let it cook for a minute or two.
However, this ended up being way too little liquid to fill the seven pint jars I had crammed the cucumber slices into. Perhaps I hadn't packed in the cucumbers tightly enough, or perhaps removing sugar from the recipe reduced the volume of the mixture. Anyway, I just boiled up four more cups of vinegar with more spices and salt and hoped for the best.
The filled jars were allowed to cool down and then put into the refrigerator where they will stay until all used up. Supposedly they will keep for months, but we won't get a chance to test that out since we are going through them pretty fast.
They are crunchy, spicy, and delicious, although a bit strong for eating more than one or two out of hand. (Next year, I will try diluting the vinegar mixture with water or packing the jars better.)
We've been enjoying them in salads, cut up into small pieces, or, best of all, as a garnish for veggie burgers along with garden tomatoes and lettuce.
Mmmmmm. And so easy. Even with the mistakes, making the pickles took not much more than an hour.
Sunday, October 31, 2010
Harvesting the Halloween . . . . . . Eggplant????
Our normally sedate town goes crazy for Halloween. The iconic vegetable of the season -- the glorious pumpkin -- is displayed everywhere. It's been fun seeing those reassuring bright orange globes appear on porches around the neighborhood. People don't hold back. Some houses have all sizes and shapes lined up along railings or sitting on each step of their front stairs.
I have to go out to see pumpkins. We don't grow them and don't even bother putting one on the porch because the trick-or-treaters never seem to make it to our cottage behind the hedge at the end of a dead end street.
Despite the dearth of pumpkins here at our hidden homestead, we have been reveling in summer bounty even as the seasons shift: picking eggplant in the autumn rain, plucking peppers and tomatoes on chilly, foggy mornings.
But there are plenty of pumpkins to admire wherever I go. On the outskirts of town I drive by fields of them swarmed by hordes of school children as the farmers make the most of their brief window of profitable time. By tomorrow those fields will be left to rot, along with the pyramids of hay bales and tee-pees of corn stalks, as the inevitable processes of decay take over.
Maybe, deep down, that's what this holiday is all about: coming to terms with the encroaching darkness. We conquer our fear of the dying of the light and take control of our worst nightmares by dressing up like them or by inviting them onto the porch and into the light so we can bribe them into playing nice and thereby harness their power.
Gardeners know that darkness and the sometimes gruesome progression of rot and decay are regenerative forces that eventually bring about surging new life. Still, there is sadness when, at the end of a productive lifespan, the pepper plant topples over because its stem has rotted or the eggplant succumbs to mildew or a sprawling zucchini plant has to be flung onto the compost pile.
So light up those Jack-O-Lanterns, folks, and lift a glass of cider to the turning of the year.
Saturday, October 30, 2010
What Would Mendel Do?
Conducting field trials of peas has never been on my lifetime list of must-do endeavors. In fact, growing peas shows up repeatedly on the "tried-it-and-it-didn't work" list. Yet in the garden one thing leads to another in unpredictable ways.
To start with, this year's pea crop was, by previous standards, a success, meaning we ended up with enough peas at one time to build a meal around them. One cup of Caseload Shelling Peas was harvested and one fabulous dinner of Peas Alfredo was enjoyed.
Then I forgot all about the pea patch until the space was needed for something else. While pulling out the dried up vines I discovered that the plants had made one last desperate effort to leave something for the next generation -- which, from their point of view, is their reason for being. There were several well-rounded pale beige pods with wrinkled seeds inside.
It seemed rude not to collect them. So I did.
When storing the gathered peas I noticed there were still some seeds left in the original packet from Natural Gardening -- larger, more uniform, and shapelier than the ones I saved. This was the parent generation of the plants I had pulled out.
Hmmmm, wouldn't it be interesting to see if one set would do better when planted out? The time was right, the space was available, why not try it?
So I divided a bed down the middle and planted my homegrown Caseload peas on one side (to the left) and the leftover Natural Gardening seeds on the other. The seeds were planted out on September 11.
The Natural Gardening seeds were older, of course, but they had been professionally grown and looked a little better. My seeds were younger and might have an advantage from being more adapted to this particular growing space. Let the trial begin!
The photo above shows the bed on September 26. In general, more of the homegrown seeds came up and appear to be growing faster.
Here's what the bed looked like on October 24. Both sets are growing well, but the homegrown seeds on the left are still ahead.
The tallest plants from the Natural Gardening seeds have cleared the third wire of the support frame. They are nice looking and would count as a success by previous standards.
The plants from homegrown seed have cleared the fourth wire and there are more of them, making a nice lush row such as I have seen and admired in other people's gardens. Criteria for success will have to be adjusted.
Monday, October 4, 2010
A Confederacy of Worms
The first time I encountered solider fly larvae in my compost bin it was as a slowly heaving mass of damp leaves. The whole surface of the bin was creepily undulating up and down. When I used a trowel to push aside the thin layer of leaves, uncovering the recently added kitchen scraps, I saw the huge, whitish, maggoty creatures pictured above. Ewwww! Backing slowly away from the bin with a sick feeling in my stomach, I ran into the house and googled "huge maggots in compost!!!!"
That's how I found out about BSF, the black soldier fly, a great friend to lazy composters everywhere, we folks who never turn the pile, just add new layers and let it sit. Now, instead of recoiling in horror, I gaze fondly on the hard-working worms and urge them on.
BSF, you are my BFF.
The black soldier fly is an attractive large flying insect that looks more like a wasp than a fly. It has no mouth parts and lives briefly in order to mate and lay eggs. It does not bite, swarm, come into houses, or carry disease. The eggs are laid in wet, organic matter in the first stages of decomposition -- such as the layer of kitchen scraps in my compost bin.
The eggs hatch in just a few days into ravenously hungry larvae that start chewing their way through any nice juicy stuff they can find. They work so fast and wiggle around so much, aerating the pile where they are working, that there is no time for nasty smelling bacteria to get a foothold and create bad smells which attract the less desirable kinds of flies.
What's not to like? No smells, no flies, and very fast breakdown of organic matter, including materials usually not recommended for compost piles, such as dairy products.
They will eat anything, including manure, sewage, roadkill, etc., and are being studied for use in municipal waste systems. Although the thought of acres of undulating worms going after a city's worth of discarded organic matter is a bit nightmarish, it doesn't diminish my admiration for these first responders of Mother Nature's breakdown team.
When the larvae are ready to pupate, they crawl away from their feeding grounds, leaving behind a dark residue that is just right for the next set of responders.
Red wiggler worms like their organic matter a bit more aged than the greedy BSF larvae. When I see masses of red worms in my bin, I know the breakdown process has moved into the next phase. When the numbers decrease then it's time to add the compost to the garden beds. If I'm impatient to add some fertility ASAP I can use the compost at the red worm stage, adding some extra organic nitrogen to make up for the nitrogen needed to fuel humus making.
When the garden variety earthworms appear, it's a signal that the compost has now become soil. I have never seen earthworms in the compost bin, only in the garden. These worms, honored by Darwin for their soil building capacity, go after the tiny broken down bits of remaining organic matter and transform them into the castings that nourish good green growth.
This confederacy of worms works together to produce the rich medium needed for continuous vegetable production in our backyard.
Sunday, September 19, 2010
Hollyhock Lore
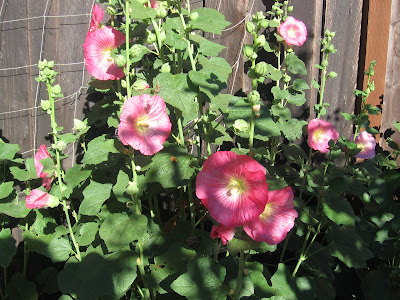
The hollyhocks along the fence are finally coming into their own. These are the second growth stalks that came up after I cut down the towering (ten or twelve feet) spring flagpoles that were not blooming and had acquired a layer of rust, due to the relentlessly cool weather.
This is a popular gathering spot for all manner of bees. Once, I saw a hummingbird inserting its tiny beak along the base of a partially opened blossom -- not inside the flower but outside. It reminded me of the deft skill of my favorite dental hygienist probing my gums. Not the most poetic image, but it does capture the expert precision of the hummingbird at work. Perhaps there are pockets of nectar hidden in the showy blooms even before they open wide?
Here's a wide open blossom, a stunning pink banner unfurled to the sun. Rose pink is thought to be the original color of these ancient medicinal plants. The botanical name, Althaea rosea, comes from the Greek "althos" for "healing."
In medieval Europe, a related plant was used to treat horses. Ailing hocks, the part right above the hoof, were wrapped in the leaves. When crusaders came back from the Holy Land, bearing the botanical cousin of this hock plant, the new arrival came to be known as the "holy hock."
The dramatic knob in the center of the blossom contains both stamen and pistils and the plant is self-pollinating. Bees love the abundant pollen so cross-pollination occurs. I have often watched the giddy buzzing things burying themselves in one blossom after another.
Maybe cross pollination accounts for the range of colors that have evolved from the original seeds from plants with dark red blooms given by a friend from the south Bay. They grew in our yard as dark pink at first, then diversified into a range of dark pink to pale pink to white.
Pale pink and white blooms showed up this year for the first time -- the third season since the original planting.
Supposedly the "holy hock" brings good fortune and abundance to homes where it is planted nearby. Planting some certainly brings an abundance of hollyhocks, since they grow back from the base and also produce myriad seeds. In our yard, the row along the fence is well established and seedlings are popping up here and there.
Thursday, September 16, 2010
Feasts of the Season
A feast for the eye; food as art. This is the best example of Eggplant Expressionism I've ever seen: the dynamic, almost careless composition, subtle range of color, and energetic play of light across the textured surface make it a real museum piece. Too bad about that. Roasted Hansel Eggplant and Sun Gold Cherry Tomatoes lasted less than a half-hour.
Tomato Sauce with Fairy Tale Eggplant and Basil, even more colorful and dynamic, was just as short-lived.
Our dining room table has become an art gallery of seasonal creations, fleeting but delicious, showcasing garden-fresh feasts for the eye and the palate almost every night.
There is hardly room on the table to display the artistic creation du jour because the clutter of work-in-progress material hogs the space: bowls of produce, jars of seeds, lables and pens.
But we persevere.
Middle Eastern Still Life. Eggplant caviar (roasted eggplant and peppers with chopped olives), lemon cucumbers with yogurt, humus and pita bread.
Tomato Puff with French Beans. The puff is one of B.s inventions: a kind of Yorkshire pudding creation of eggs, cottage cheese, and cheddar cheese with a little flour. I'll take credit for the Haricot beans. The variety is Nickel and they are a breeze to grow.
Composition in Brown and Beige. There was nothing from the garden in this loaf of rye bread with corriander seeds, but it's worth sharing for sheer artistic merit. (Recipe from Healthy Bread in Five Minutes a Day.)